STM32MP15 TF-A
目录
Article Purpose
本节详细介绍了从源构建TF-A并将其部署到目标上的过程。
构建示例基于OpenSTLinux环境:
- 开发人员包
- 程序的发行包
Overview
TF-A是ST受信任引导链的FSBL。它必须根据您的平台进行配置或更新。
TF-A的交叉编译仅在需要修改时才需要。 默认情况下,在入门包中,TF-A映像的名称为:
tf-<board>-trusted.stm32.
进行更改后,您必须重建TF-A并使用此新映像更新引导设备的所有FSBL分区。 第二个FSBL映像用作备用映像。
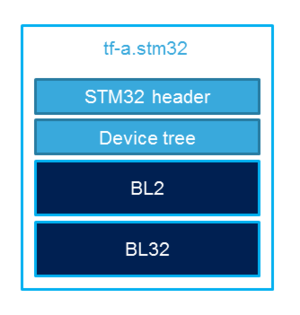
构建过程将创建完整的STM32映像,该映像可用于Flash集成特定的header.
此受信任的固件-A映像包含设备树,BL2和BL32级。
这些二进制文件是在构建过程中一步完成的。
Developer Package
Install sources
开发包包含OpenSTLinux和TF-A源: TF-A Installation
Official source tree
| STM32MP1平台尚未完全上行。 因此此存储库中的功能不可用 |
从官方GitHub下载源代码
PC $> git clone https://github.com/ARM-software/arm-trusted-firmware.git
从内部git下载源代码
PC $> git clone ssh://gerrit.st.com:29418/mpu/oe/st/tf-a.git
Build Process
Initialise the cross compile environment
TF-A Build flags
For ecosystem release ≥ v1.2.0{{#set:Ecosystem release=revision of a previous flow 1.2.0}}
强制性标志:
- ARM_ARCH_MAJOR=7: 要针对的ARM体系结构的主要版本(STM32MP15基于ARMv7体系结构)
- ARCH=aarch32: 指定要构建的aarch32体系结构
- PLAT=stm32mp1: 构建一个stm32mp1平台
- DTB_FILE_NAME=<fdt file name>.dtb: 必须定义此名称以构建适当的目标并将正确的DTB文件包括到最终文件中
- AARCH32_SP=<monitor>
- sp_min: 如果需要,可构建BL32安全监视器
- optee: 不要包括BL32,并准备BL2以应对optee专用的负载,这也需要使用'STM32MP_BOOT_ONLY = 1'选项进行构建。
可选标志:
- STM32MP_BOOT_ONLY=1: 构建所有存储驱动程序支持(串行除外)(不支持stm32_programmer)。OP-TEE模式必需。
- STM32MP_FLASHLOADER_ONLY=1: 仅构建串行链接驱动程序支持(UART / USB)和stm32_programmer支持。
- DEBUG=1: 在所有二进制文件中添加调试信息
- V=1: 打印详细的编译痕迹
- STM32MP_FPGA=1: 包括FPGA特定代码(与板不兼容)
- STM32MP1_TEST=1: 启用特定SMC以进行测试(强制验证)
For ecosystem release v1.1.0{{#set:Ecosystem release=revision of a previous flow 1.1.0}}
Mandatory flags:
- ARM_ARCH_MAJOR=7: the major version of ARM Architecture to target (STM32MP15 is ARMv7 architecture based)
- ARCH=aarch32: specify aarch32 architecture to be built
- PLAT=stm32mp1: builds an stm32mp1 platform
- DTB_FILE_NAME=<fdt file name>.dtb: this must be defined to build the proper target and include the correct DTB file into the final file
- AARCH32_SP=<monitor>
- sp_min: builds the BL32 secure monitor if required
- optee: do not include BL32 and prepare BL2 for optee-specific load
Optional flags:
- DEBUG=1: add debug information in all binaries
- V=1: print verbose compilation traces
<securetransclude src="ProtectedTemplate:InternalInfo" params="* STM32MP_FPGA'"`UNIQ--nowiki-00000000-QINU`"'1: include FPGA specific code (not compatible with board)
- STM32MP1_TEST'"`UNIQ--nowiki-00000000-QINU`"'1: enable specific SMC for test purposes (mandatory for validation)"></securetransclude>
Build command
From the Developer Package tarball, a Makefile.sdk is present and must be used to build the target.
It automatically sets the proper configuration for the TF-A build.
PC $> make -f Makefile.sdk TF_A_CONFIG=trusted TFA_DEVICETREE=stm32mp157c-<board>
The latest version of the helper file is also available in this user guide: README.HOW_TO.txt
| The DTB_FILE_NAME flag must be set to select the correct board configuration. The device tree file for the target must be located in fdts folder (stm32mp157c-<board>.dts) |
If no Makefile.sdk exists, you must add your own environment flags:
 PC $> unset LDFLAGS;
 PC $> unset CFLAGS;
 PC $> make ARM_ARCH_MAJOR=7 ARCH=aarch32 PLAT=stm32mp1 AARCH32_SP=sp_min DTB_FILE_NAME=stm32mp157c-<board>.dtb
Final image
Final image is available for Flash or SD card update in the corresponding folder:
build/<target>/<debug|release>/tf-a-<target>.stm32
Ex:
build/stm32mp1/debug/tf-a-stm32mp157c-ev1.stm32
Distribution Package
For an OpenSTLinux distribution, the TF-A image is built in release mode by default. The yocto recipe can be found in:
meta-st/meta-st-stm32mp/recipes-bsp/trusted-firmware-a/tf-a-stm32mp_<version>.bb
If you want to modify the TF-A code source, use the following steps starting from an already downloaded and built OpenSTLinux distribution.
Access sources
You can use devtool to access the source.
 PC $> cd <baseline root directory>
 PC $> devtool modify tf-a-stm32mp sources/boot/tf-a
By going to the sources/boot/tf-a folder, you can manage and modify the TF-A sources. To rebuild it, go back to the build-<distribution> folder and launch the TF-A recipe:
PC $> bitbake tf-a-stm32mp
The final image is deployed in the image default output folder.
Update software on board
Partitioning of binaries
The TF-A build provides a binary named tf-a-stm32mp157c-<board>.stm32 that MUST be copied to a dedicated partition named "fsblX" (X depends of needed backup).
| TF-A must be located in the first partition of your boot device. You can just update the first partition for a simple test, but all backup partitions must contain the same image at the end. |
Update via SDCARD
If you use an SD card, you can simply update TF-A using the dd command on your host.
Plug your SD card into the computer and copy the binary to the dedicated partition; on an SDCard/USB disk the "fsbl1" partition is partition 1:
 - SDCARD: /dev/mmcblkXp1 (where X is the instance number)
 - SDCARD via USB reader: /dev/sdX1 (where X is the instance number)
- Linux
PC $> dd if=<tf-a file> of=/dev/<device partition> bs=1M conv=fdatasync
| To find the partition associated to a specific label, just plug the
SDCARD/USB disk into your PC and call the following command: PC $> ls -l /dev/disk/by-partlabel/ total 0 lrwxrwxrwx 1 root root 10 Jan 17 17:38 bootfs -> ../../mmcblk0p4 lrwxrwxrwx 1 root root 10 Jan 17 17:38 fsbl1 -> ../../mmcblk0p1 ➔ FSBL1 (TF-A) lrwxrwxrwx 1 root root 10 Jan 17 17:38 fsbl2 -> ../../mmcblk0p2 ➔ FSBL2 (TF-A backup – same content as FSBL) lrwxrwxrwx 1 root root 10 Jan 17 17:38 rootfs -> ../../mmcblk0p5 lrwxrwxrwx 1 root root 10 Jan 17 17:38 ssbl -> ../../mmcblk0p3 ➔ SSBL (U-Boot) lrwxrwxrwx 1 root root 10 Jan 17 17:38 userfs -> ../../mmcblk0p6 |
- Windows
There is an existing dd for Windows that makes binary copying possible.
Update via USB mass storage on U-boot
Follow the previous section to put tf-a-<board>.stm32 onto SDCard/USB disk
Update your boot device (including SD card on the target)
Refer to the STM32CubeProgrammer documentation to update your target.
<securetransclude src="ProtectedTemplate:PublicationRequestId" params="12345 | 2018-10-10 | PhilipS"></securetransclude>