“100ask Fire-imx6ull pro”的版本间的差异
| 第130行: | 第130行: | ||
<syntaxhighlight lang="bash"> | <syntaxhighlight lang="bash"> | ||
book@100ask:~$ git clone https://git.dev.tencent.com/codebug8/repo.git | book@100ask:~$ git clone https://git.dev.tencent.com/codebug8/repo.git | ||
| − | book@100ask:~$ mkdir -p | + | book@100ask:~$ mkdir -p 100ask_fire-imx6ull && cd 100ask_fire-imx6ull |
| − | book@100ask:~/ | + | book@100ask:~/100ask_fire-imx6ull$ ../repo/repo init -u https://dev.tencent.com/u/weidongshan/p/manifests/git -b linux-sdk -m imx6ull/fire-imx6ull_linux_release_v1.0.xml --no-repo-verify |
| − | book@100ask:~/ | + | book@100ask:~/100ask_fire-imx6ull$ ../repo/repo sync -j4 |
</syntaxhighlight> | </syntaxhighlight> | ||
上面使用的repo管理为国内coding仓库 | 上面使用的repo管理为国内coding仓库 | ||
| 第146行: | 第146行: | ||
export ARCH=arm | export ARCH=arm | ||
export CROSS_COMPILE=arm-linux-gnueabihf- | export CROSS_COMPILE=arm-linux-gnueabihf- | ||
| − | export PATH=$PATH:/home/book/ | + | export PATH=$PATH:/home/book/100ask_fire-imx6ull/ToolChain/gcc-linaro-6.2.1-2016.11-x86_64_arm-linux-gnueabihf/bin |
* 临时生效 | * 临时生效 | ||
执行完“export”命令后,该设置只对当前终端有效 | 执行完“export”命令后,该设置只对当前终端有效 | ||
<syntaxhighlight lang="bash"> | <syntaxhighlight lang="bash"> | ||
| − | book@100ask:~$ export PATH=$PATH:/home/book/ | + | book@100ask:~$ export PATH=$PATH:/home/book/100ask_fire-imx6ull/ToolChain/gcc-linaro-6.2.1-2016.11-x86_64_arm-linux-gnueabihf/bin |
book@100ask:~$ export ARCH=arm | book@100ask:~$ export ARCH=arm | ||
book@100ask:~$ export CROSS_COMPILE=arm-linux-gnueabihf- | book@100ask:~$ export CROSS_COMPILE=arm-linux-gnueabihf- | ||
| 第158行: | 第158行: | ||
Make编译时指定ARCH架构 CROSS_COMPILE交叉编译工具链 | Make编译时指定ARCH架构 CROSS_COMPILE交叉编译工具链 | ||
<syntaxhighlight lang="bash"> | <syntaxhighlight lang="bash"> | ||
| − | book@100ask:~$ export PATH=$PATH:/home/book/ | + | book@100ask:~$ export PATH=$PATH:/home/book/100ask_fire-imx6ull/ToolChain/gcc-linaro-6.2.1-2016.11-x86_64_arm-linux-gnueabihf/bin |
book@100ask:~$ make ARCH=arm CROSS_COMPILE=arm-linux-gnueabihf- | book@100ask:~$ make ARCH=arm CROSS_COMPILE=arm-linux-gnueabihf- | ||
</syntaxhighlight> | </syntaxhighlight> | ||
| 第168行: | 第168行: | ||
*编译野火imx6ull_mini开发板uboot命令 | *编译野火imx6ull_mini开发板uboot命令 | ||
<syntaxhighlight lang="bash"> | <syntaxhighlight lang="bash"> | ||
| − | book@100ask:~$ cd ~/ | + | book@100ask:~$ cd ~/100ask_fire-imx6ull/uboot2017.03 |
| − | book@100ask: ~/ | + | book@100ask: ~/100ask_fire-imx6ull/uboot2017.03 $ make distclean |
| − | book@100ask: ~/ | + | book@100ask: ~/100ask_fire-imx6ull/uboot2017.03 $ make mx6ull_14x14_S1-pro_defconfig |
| − | book@100ask: ~/ | + | book@100ask: ~/100ask_fire-imx6ull/uboot2017.03 $ make |
</syntaxhighlight> | </syntaxhighlight> | ||
*单独烧写uboot | *单独烧写uboot | ||
使用dd命令烧写img镜像文件到TF卡中。 | 使用dd命令烧写img镜像文件到TF卡中。 | ||
| − | book@100ask:~/ | + | book@100ask:~/100ask_fire-imx6ull/uboot2017.03 $ dd if=u-boot-dtb.imx of=/dev/sdb bs=1k seek=1 conv=fsync |
* nfs启动系统 | * nfs启动系统 | ||
| 第192行: | 第192行: | ||
*编译野火imx6ull_mini开发板内核 | *编译野火imx6ull_mini开发板内核 | ||
<syntaxhighlight lang="bash"> | <syntaxhighlight lang="bash"> | ||
| − | book@100ask:~/ | + | book@100ask:~/100ask_fire-imx6ull$ cd linux-4.9.88 |
| − | book@100ask:~/ | + | book@100ask:~/100ask_fire-imx6ull/linux-4.9.88$ make mrproper |
| − | book@100ask:~/ | + | book@100ask:~/100ask_fire-imx6ull/linux-4.9.88$ make imx_v7_ebf_defconfig |
| − | book@100ask:~/ | + | book@100ask:~/100ask_fire-imx6ull/linux-4.9.88$ make zImage -jN //这里可以根据CPU个数,来加速编译系统。 |
| − | book@100ask:~/ | + | book@100ask:~/100ask_fire-imx6ull/linux-4.9.88$ make dtbs |
</syntaxhighlight> | </syntaxhighlight> | ||
*编译内核模块 | *编译内核模块 | ||
<syntaxhighlight lang="bash"> | <syntaxhighlight lang="bash"> | ||
| − | book@100ask:~/ | + | book@100ask:~/100ask_fire-imx6ull/linux-4.9.88$ make ARCH=arm CROSS_COMPILE=arm-linux-gnueabihf- modules |
</syntaxhighlight> | </syntaxhighlight> | ||
安装内核模块到nfs根文件系统 | 安装内核模块到nfs根文件系统 | ||
<syntaxhighlight lang="bash"> | <syntaxhighlight lang="bash"> | ||
| − | book@100ask:~/ | + | book@100ask:~/100ask_fire-imx6ull/linux-4.9.88$ sudo make ARCH=arm INSTALL_MOD_PATH=/media/rootfs modules_install |
</syntaxhighlight> | </syntaxhighlight> | ||
*uboot通过tftp方式下载内核 | *uboot通过tftp方式下载内核 | ||
| − | 将编译成功的'''zImage'''文件和设备树'''imx6ull-14x14-ebf | + | 将编译成功的'''zImage'''文件和设备树'''imx6ull-14x14-ebf.dtb'''文件,拷贝到ubuntu的<code>/home/book/tftpboot</code> 目录下,<br> |
用以uboot通过tftp 方式进行下载并启动系统。 | 用以uboot通过tftp 方式进行下载并启动系统。 | ||
| 第220行: | 第220行: | ||
! 配置文件 !! 含义 | ! 配置文件 !! 含义 | ||
|- | |- | ||
| − | | | + | |fire-imx6ull_pro_defconfig || 文件系统版本 |
|} | |} | ||
*编译步骤 | *编译步骤 | ||
<syntaxhighlight lang="bash"> | <syntaxhighlight lang="bash"> | ||
| − | book@100ask:~/ | + | book@100ask:~/100ask_fire-imx6ull$ cd buildroot2019.02 |
| − | book@100ask:~/ | + | book@100ask:~/100ask_fire-imx6ull/buildroot2019.02$ make clean |
| − | book@100ask:~/ | + | book@100ask:~/100ask_fire-imx6ull/buildroot2019.02$ make fire-imx6ull_pro_defconfig |
| − | book@100ask:~/ | + | book@100ask:~/100ask_fire-imx6ull/buildroot2019.02$ make menuconfig |
| − | book@100ask:~/ | + | book@100ask:~/100ask_fire-imx6ull/buildroot2019.02$ make all |
</syntaxhighlight> | </syntaxhighlight> | ||
'''注意:机器性能不同,编译时间不同。性能差的电脑,有可能需要等待1 ~ 2个小时。''' | '''注意:机器性能不同,编译时间不同。性能差的电脑,有可能需要等待1 ~ 2个小时。''' | ||
| 第237行: | 第237行: | ||
├── output | ├── output | ||
├── images | ├── images | ||
| − | ├── imx6ull-14x14-ebf-mini.dtb <-- | + | ├── imx6ull-14x14-ebf-mini.dtb <--野火imx6ull mini板设备树文件 |
| + | ├── imx6ull-14x14-ebf.dtb <--野火imx6ull pro版设备树文件 | ||
├── rootfs.cpio | ├── rootfs.cpio | ||
│ rootfs.cpio.gz | │ rootfs.cpio.gz | ||
| 第255行: | 第256行: | ||
把使用buildroot构建得到的根文件系统nfs_rootfs/rootfs.tar.gz,复制、解压到ubuntu的/etc/exports文件中指定的目录里,即复制到/home/book目录下,得到/home/book/nfs_rootfs下众多文件: | 把使用buildroot构建得到的根文件系统nfs_rootfs/rootfs.tar.gz,复制、解压到ubuntu的/etc/exports文件中指定的目录里,即复制到/home/book目录下,得到/home/book/nfs_rootfs下众多文件: | ||
<syntaxhighlight lang="bash"> | <syntaxhighlight lang="bash"> | ||
| − | book@100ask:~/ | + | book@100ask:~/100ask_fire-imx6ull/buildroot2019.02/output/images$ cp -rf nfs_rootfs/ ~ |
| − | book@100ask:~/ | + | book@100ask:~/100ask_fire-imx6ull/buildroot2019.02/output/images$ cd ~/nfs_rootfs |
book@100ask:~/nfs_rootfs$ sudo tar -zxvf rootfs.tar.gz | book@100ask:~/nfs_rootfs$ sudo tar -zxvf rootfs.tar.gz | ||
</syntaxhighlight> | </syntaxhighlight> | ||
=获取帮助与反馈建议= | =获取帮助与反馈建议= | ||
2019年10月16日 (三) 14:16的版本
- 初学者请从这里开始: 初学者学习路线
- 韦东山升级版全系列视频开发板BSP包
请根据自己购买的开发板下载相应的资料光盘
目录
野火imx6ull-mini简介
EBF6ULL S1 Mini 开发板提供完整的SDK 驱动开发包、核心板封装库,底板应用参考设计原理图,可帮助客户大大缩减产品的开发时间,加快产品上市。
目前提供Linux 4.1.15/4.9.88版本的内核,配套的系统自带python、Qt 等组件。
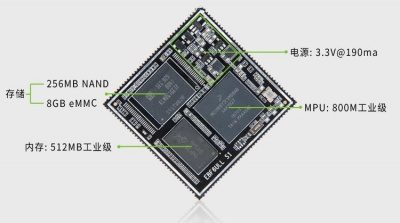
开发板整板由EBF6ULL S1 核心板模组和底板组成,具体见下图,元件采用工业级选料,其中核心板板载主控芯片512MB DDR3L 内存,256/512MB Nand-FLASH(或8GBeMMC)。
核心板特征
核心板PCB 采用8 层黑色沉金设计,单面放元件,整体尺寸39x39mm,共140 个引脚,
引脚间距1.0mm,除了SEMC 总线引脚外,芯片其余IO 均引出。
该核心板适用于工业控制、手持扫码、喷墨打印机、轨道交通、无人机控制和音频输出等领域。
EBF6ULL S1 核心板模组参数如下:
- CPU:NXP MCIMX6Y2CVM08AB 处理器
- 频率:工业级最高可达792MHz
- DDR3L 内存:板载512MB DDR3L
- FLASH 存储器示不同型号的板子,使用以下其中一种配置:
- 板载256MB 或512MB 的 Nand-FALSH
- 板载8GB 的eMMC
- PCB:8 层黑色沉金,尺寸为39 x39mm
- 封装:邮票孔封装,单面元件,背面没有元件,底板不需要挖槽
使用不同存储器版本的开发板时,主要区别在于设置不同的启动方式,以及使用系统 时要注意其容量大小
[[File:|500px|right|thumb|frameless|底板反面功能示意图]]
底板特征介绍
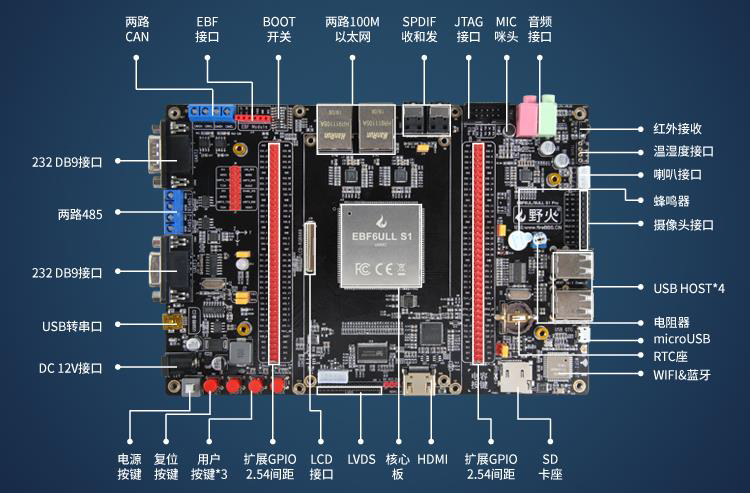
EBF6ULL S1 pro 底板参数如下:
- 尺寸 200*13.5MM
- PCB 2 层、黑色沉金
- DC12V 接口 DC 12V@2A 直流输入,不支持电脑USB 供电,因为电流不够
- USB 转串口 使用MiniUSB 接口,使用CH340 驱动
- KEY RESET 1 个,ONOFF 1 个,WAKEUP 1 个,MODE1 个
- RGB 灯 由三个独立的R、G、B 小灯组成
- 六轴陀螺仪 型号MPU6050
- DB9 接口 2 路,1 路母头DB9,1 路公头DB9,使用RS232 协议
- 485 接口 2 路,2 线接线柱引出, 使用RS485 协议
- CAN 接口 2 路,2 线接线柱引出 ,使用CAN 协议
- EBF 接口 1 个,使用1*6P 2.54 间距排母引出,适用于连接使用串口协议的小模块
- 启动配置 通过1 个8 位的拨码开关配合实现
- 以太网 2 路百兆以太网,型号KSZ8081RNB
- SPDIF 收发 1x SPDIFIN,DLT-1150 光纤座;1x SPDIFOUT,DLR-1150 光纤座,用于音频光纤输入输出
- JTAG 接口 1 个,使用2*5P 2.54 间距牛角座引出
- 音频接口 1x LINE IN,3.5mm 音频座;1x LINE OUT,3.5mm 音频座;1x MICIN,电容咪头,使用WM8960 编解码芯片
- 环境光传感器 型号AP3216C
- 红外接收 型号HS1838
- 温湿度接口 可接入DHT11/DS18B20 传感器
- 喇叭接口 1x4p XH2.0 接口引出,可用型号:3080
- 摄像头接口 可直接配套野火OV5640 摄像头
- 蜂鸣器 有源蜂鸣器,3.3V 驱动
- USB HOST 4 路通过芯片原生外扩,A 型母座双层USB 接口
- 电位器 1K 阻值变动
- micro USB 原生引出,支持OTG
- RTC 座子 电池座,适用电池型号CR1220
- WIFI&蓝牙 型号:AP6236,不能与SD 卡同时使用
- SD 卡座 microSD 卡卡座,支持SD3.0,不能与WIFI 同时使用
- 电容按键 可检测到触摸开关状态
- HDMI 接口 RGB 转HDMI
- LVDS 接口 RGB 转LVDS,通过2x15P 2.0 间距排针引出
- LCD 接口 FPC 接口,RGB888 及I2C 触摸信号,支持直接连接野火的5 寸/7 寸/4.3 寸屏
- GPIO 通过两排2*40P 的2.54 间距排针引出,可自主连接各种外部设备
快速使用
准备工作
要使用你的fire imx6ull pro开发板,请提前准备好以下资源:
- 一台可以上网的windows电脑
- 野火imx6ull pro开发板
- microSD卡/TF卡: Class10或以上的 8GB SDHC卡
- 一个5v/3A的DC接口电源适配器
- VMware-player-15.1.5.exe
- Vmware ubuntu 18.04 64位虚拟机镜像
- win32diskimager-1.0.0-install.exe
- MobaXterm_Portable_v11.0.zip
开发板连接示意图请参考右边的连接方式,连接后用MobaXterm串口工具进行登录。
更新系统/烧写img镜像文件
sd卡启动
请提前下载好配套的资料(本页最开头有下载链接),拷贝下列文件到到下载目录:
Firefly-rk3288_board/firefly-rk3288_视频配套资料_2019.07.16/02_Images/Sdcard_img目录下的sdcard.img
然后通过如下操作进行烧写更新系统。
- 1.安装资料光盘下
01_tools\SD Card Formatter 5.0.1 Setup.exe软件,安装完成后打开!
- 2.使用SdCardFormatter格式化SD卡,格式化步骤如下如所示!

|

|

|
| (1)选择要格式化的SD卡,选中Quick format,点击Format | (2)在弹出的对话框中点击是(Y) | (3)等待格式化完成,在弹出的对话框中点击确定 |
- 3.安装资料光盘下
01_tools/ win32diskimager-1.0.0-install.exe软件,安装完成后打开!
- 4.使用wind32diskimage烧写存放在下载目录的
sdcard.img系统镜像文件,烧写步骤如下所示!

|

|

|
| (1)选中需要烧写的SD卡设备,点击文件图标选择系统镜像文件,最后点击写入按钮开始烧写 | (2)此时弹出烧写对话框,点击Yes按钮,继续烧写, 等待任务进度执行到100%) | 烧写成功后,弹出写入成功,此时点击OK |
烧写nandflash系统
烧写emmc系统
编译100ask linux sdk系统
简介:以下资源仅限于在百问网官方购买及百问网授权店铺购买的开发板上使用,我们在官方的基础上做了大量的定制化修改,精简了系统,简化下载以及编译流程,更大的提升开发效率,系统不同于野火官方系统。
获取源码
| 类别 | 国内coding仓库 | 国外github仓库 |
|---|---|---|
| u-boot | https://git.dev.tencent.com/weidongshan/imx6ulx_uboot.git | |
| linux kernel | https://git.dev.tencent.com/weidongshan/imx6ulx_kernel.git | |
| 根文件系统 | https://git.dev.tencent.com/weidongshan/imx6ul_buildroot.git |
git邮箱账号和用户名配置
book@100ask:~$  git config --global user.email "you@example.com"
book@100ask:~$  git config --global user.name "Your Name"
初次使用,需要配置用户名和密码才可以进行代码同步,用户名和密码根据自己情况设定,也可以随意设定
考虑到代码仓库过多,特使用repo工具管理代码
- repo工具获取sdk
book@100ask:~$  git clone  https://git.dev.tencent.com/codebug8/repo.git
book@100ask:~$  mkdir -p 100ask_fire-imx6ull && cd 100ask_fire-imx6ull
book@100ask:~/100ask_fire-imx6ull$ ../repo/repo init -u https://dev.tencent.com/u/weidongshan/p/manifests/git -b linux-sdk -m imx6ull/fire-imx6ull_linux_release_v1.0.xml --no-repo-verify
book@100ask:~/100ask_fire-imx6ull$ ../repo/repo sync -j4
上面使用的repo管理为国内coding仓库
设置工具链
交叉编译工具链主要是用于在ubuntu主机上编译并声称可以在其它平台上运行的系统。设置交叉编译工具主要是设置PATH, ARCH和CROSS_COMPILE三个环境变量,下面介绍具体设置方法。
- 永久生效
如需永久修改,请修改用户配置文件, Ubuntu系统下,修改如下:
vim ~/.bashrc
在行尾添加或修改:
export ARCH=arm
export CROSS_COMPILE=arm-linux-gnueabihf-
export PATH=$PATH:/home/book/100ask_fire-imx6ull/ToolChain/gcc-linaro-6.2.1-2016.11-x86_64_arm-linux-gnueabihf/bin
- 临时生效
执行完“export”命令后,该设置只对当前终端有效
book@100ask:~$ export PATH=$PATH:/home/book/100ask_fire-imx6ull/ToolChain/gcc-linaro-6.2.1-2016.11-x86_64_arm-linux-gnueabihf/bin
book@100ask:~$ export ARCH=arm
book@100ask:~$ export CROSS_COMPILE=arm-linux-gnueabihf-
- 手动指定
Make编译时指定ARCH架构 CROSS_COMPILE交叉编译工具链
book@100ask:~$ export PATH=$PATH:/home/book/100ask_fire-imx6ull/ToolChain/gcc-linaro-6.2.1-2016.11-x86_64_arm-linux-gnueabihf/bin
book@100ask:~$ make ARCH=arm CROSS_COMPILE=arm-linux-gnueabihf-
编译uboot
准备工作
安装TFTP NFS服务请参考 Ubuntu环境配置,设置如下参数让系统通过网络挂载方式启动,方便调试。
其中TFTP目录假设为 /home/book/tftpboot NFS目录假设为 /home/book/nfs_rootfs
注意:以下操作会破坏SD卡的数据,请先进行备份。
- 编译野火imx6ull_mini开发板uboot命令
book@100ask:~$  cd ~/100ask_fire-imx6ull/uboot2017.03
book@100ask: ~/100ask_fire-imx6ull/uboot2017.03 $ make distclean
book@100ask: ~/100ask_fire-imx6ull/uboot2017.03 $ make mx6ull_14x14_S1-pro_defconfig
book@100ask: ~/100ask_fire-imx6ull/uboot2017.03 $ make
- 单独烧写uboot
使用dd命令烧写img镜像文件到TF卡中。
book@100ask:~/100ask_fire-imx6ull/uboot2017.03 $ dd if=u-boot-dtb.imx of=/dev/sdb bs=1k seek=1 conv=fsync
- nfs启动系统
注意: serverip为你的ubuntu IP 地址 ipaddr 为你给开发板设置的IP地址,设置IP完成后可以通过 ping 命令来确认是否连通。 其中rootpath 指定的是ubuntu下解压的firefly-rk3288文件系统所在目录。
=> setenv ipaddr 192.168.1.112
=> setenv serverip 192.168.1.132
=> setenv nfsroot /home/book/nfs_rootfs,vers=3
执行 run netboot 命令后,uboot会自动根据设置的参数,下载复制到 /home/book/tftpboot目录下的设备树文件和内核文件以及挂载nfs文件系统。
编译linux kernel
- 准备工作
安装TFTP NFS服务请参考 Ubuntu环境配置,设置如下参数让系统通过网络挂载方式启动,方便调试。
其中TFTP目录假设为 /home/book/tftpboot NFS目录假设为 /home/book/nfs_rootfs
- 编译野火imx6ull_mini开发板内核
book@100ask:~/100ask_fire-imx6ull$ cd linux-4.9.88
book@100ask:~/100ask_fire-imx6ull/linux-4.9.88$ make mrproper
book@100ask:~/100ask_fire-imx6ull/linux-4.9.88$ make imx_v7_ebf_defconfig
book@100ask:~/100ask_fire-imx6ull/linux-4.9.88$ make zImage -jN //这里可以根据CPU个数,来加速编译系统。
book@100ask:~/100ask_fire-imx6ull/linux-4.9.88$ make dtbs
- 编译内核模块
book@100ask:~/100ask_fire-imx6ull/linux-4.9.88$ make ARCH=arm CROSS_COMPILE=arm-linux-gnueabihf- modules
安装内核模块到nfs根文件系统
book@100ask:~/100ask_fire-imx6ull/linux-4.9.88$ sudo make ARCH=arm INSTALL_MOD_PATH=/media/rootfs modules_install
- uboot通过tftp方式下载内核
将编译成功的zImage文件和设备树imx6ull-14x14-ebf.dtb文件,拷贝到ubuntu的/home/book/tftpboot 目录下,
用以uboot通过tftp 方式进行下载并启动系统。
编译根文件系统
准备工作
安装TFTP NFS服务请参考 Ubuntu环境配置,设置如下参数让系统通过网络挂载方式启动,方便调试。
其中TFTP目录假设为 /home/book/tftpboot NFS目录假设为 /home/book/nfs_rootfs
- 文件系统特征
| 配置文件 | 含义 |
|---|---|
| fire-imx6ull_pro_defconfig | 文件系统版本 |
- 编译步骤
book@100ask:~/100ask_fire-imx6ull$ cd buildroot2019.02
book@100ask:~/100ask_fire-imx6ull/buildroot2019.02$ make clean
book@100ask:~/100ask_fire-imx6ull/buildroot2019.02$ make fire-imx6ull_pro_defconfig
book@100ask:~/100ask_fire-imx6ull/buildroot2019.02$ make menuconfig
book@100ask:~/100ask_fire-imx6ull/buildroot2019.02$ make all
注意:机器性能不同,编译时间不同。性能差的电脑,有可能需要等待1 ~ 2个小时。
- 编译后生成文件介绍
buildroot2019.02
	├── output
		├── images
			├── imx6ull-14x14-ebf-mini.dtb	    <--野火imx6ull mini板设备树文件
                        ├── imx6ull-14x14-ebf.dtb	            <--野火imx6ull pro版设备树文件
			├── rootfs.cpio
			│   rootfs.cpio.gz
			├── rootfs.cpio.uboot
			├── rootfs.ext2			    <--ext2格式根文件系统
			├── rootfs.ext4 -> rootfs.ext2	    <--ext2格式根文件系统
			├── rootfs.tar			    <--打包并压缩的根文件系统,适用于NFSROOT启动
			├── rootfs.ubi                           <--用于nandflash启动的文件系统镜像
			├── rootfs.ubifs
			├── sdcard.img			    <--完整的SD卡系统镜像
			├── u-boot-dtb.imx			    <--u-boot镜像
			└── zImage				<--内核镜像
buildroot详细的使用介绍请参考Buildroot
- 解压文件系统nfs目录
把使用buildroot构建得到的根文件系统nfs_rootfs/rootfs.tar.gz,复制、解压到ubuntu的/etc/exports文件中指定的目录里,即复制到/home/book目录下,得到/home/book/nfs_rootfs下众多文件:
book@100ask:~/100ask_fire-imx6ull/buildroot2019.02/output/images$ cp -rf nfs_rootfs/  ~
book@100ask:~/100ask_fire-imx6ull/buildroot2019.02/output/images$ cd ~/nfs_rootfs
book@100ask:~/nfs_rootfs$ sudo tar -zxvf rootfs.tar.gz

