“I2C overview”的版本间的差异
| (未显示同一用户的15个中间版本) | |||
| 第15行: | 第15行: | ||
==System overview== | ==System overview== | ||
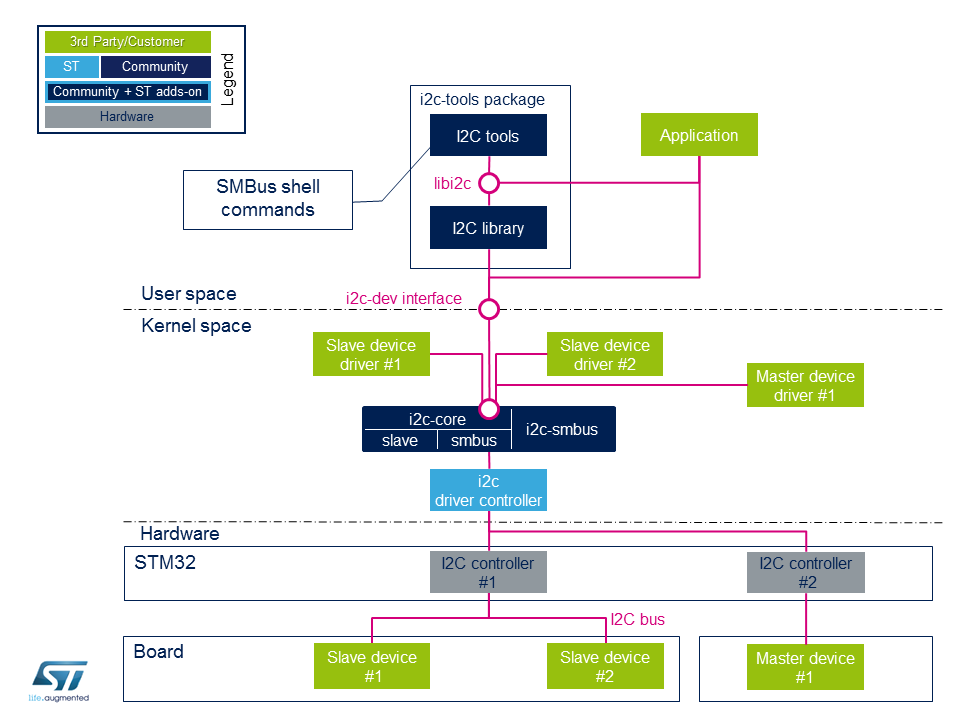
| − | I<sup>2</sup>C | + | I<sup>2</sup>C 是“ IC间总线”的缩写,“ Inter-IC”总线是一种简单的总线协议,广泛用于低数据速率通信就足够了。<br /> |
| − | + | I2C是微处理器 I<sup>2</sup>C 外围设备接口的缩写。 | |
| − | + | 在微处理器设备周围,用户可以添加许多 I<sup>2</sup>C 外部设备来创建定制板。 可以通过I2C从用户空间或内核空间访问每个外部设备。 | |
{{ImageMap| | {{ImageMap| | ||
| 第43行: | 第43行: | ||
===Component description=== | ===Component description=== | ||
====Board external I<sup>2</sup>C devices==== | ====Board external I<sup>2</sup>C devices==== | ||
| − | * | + | * 从设备X是相对于STM32表现为从设备的物理设备(通过 I<sup>2</sup>C 总线连接到STM32)。<br/> |
| − | * | + | STM32仍是 I<sup>2</sup>C 总线上的主机。 |
| + | * 主设备X是相对于STM32充当主设备的物理设备 (通过 I<sup>2</sup>C 总线连接到STM32) 。<br/> | ||
| + | 在这种情况下,STM32充当 I<sup>2</sup>C 总线上的从设备。 | ||
====STM32 I2C internal peripheral controller==== | ====STM32 I2C internal peripheral controller==== | ||
| − | + | 它对应于STM32 I2C适配器,该适配器处理与同一总线上连接的任何外部设备的通信。 <br/>它管理从设备(如果有的话),并且如果连接了外部主设备,则可以充当从设备。 | |
| − | + | STM32微处理器设备通常嵌入 [[I2C internal peripheral]] 的多个实例,以管理多个I2C总线。 提供了一个驱动程序,用于控制硬件。 | |
| − | |||
====i2c-stm32==== | ====i2c-stm32==== | ||
| − | + | 内部STM32 I2C控制器驱动程序向基于i2c-core-base的ST I2C内部外围控制器抽象层提供了支持。<br/> 它定义了I2C核心基础要使用的所有I2C传输方法算法,其中包括I2C和SMBus<ref name="More about SMBus">https://www.i2c-bus.org/smbus/</ref> 传输API ,注册/注销从属API和功能检查。<br/> 即使I2C Core可以在整个标准I2C消息中模拟SMBus协议,所有SMBus功能都在驱动程序中实现。 | |
====i2c-core==== | ====i2c-core==== | ||
| − | + | 这是通信的大脑:它实例化和管理所有总线和外围设备。 | |
| − | * '''{{Highlight|i2c-core}}''' | + | * 如其名称所述,为'''{{Highlight|i2c-core}}''' ,它是I2C核心引擎,但它也负责解析适配器和/或设备的设备树条目 |
| − | * '''{{Highlight|i2c-core-smbus}}''' | + | * '''{{Highlight|i2c-core-smbus}}'''处理所有与SMBus相关的API。 |
| − | * '''{{Highlight|i2c-core-slave}}''' | + | * '''{{Highlight|i2c-core-slave}}''' 管理充当STM32中的从设备的I2C设备。 |
| − | * '''{{Highlight|i2c-smbus}}''' | + | * '''{{Highlight|i2c-smbus}}'''处理特定的协议SMBus警报。 (由I2C核心库处理的SMBus主机通知) |
====Board peripheral drivers==== | ====Board peripheral drivers==== | ||
| − | + | 该层表示与物理外围设备关联的所有驱动程序。<br/> | |
| − | + | 外围设备驱动程序可以编译为内核模块,也可以直接编译为内核(也称为内置). | |
====i2c-dev==== | ====i2c-dev==== | ||
| − | i2c- | + | i2c-dev是用户与外围设备之间的接口。 |
| − | + | 它是一个内核驱动程序,它使用此dev-interface API提供对用户空间应用程序的I2C总线访问。 | |
| − | + | 请参见示例[[I2C overview#API_description|API Description]]. | |
====i2c-tools==== | ====i2c-tools==== | ||
| − | [[I2C_i2c-tools | I2C Tools]] | + | [[I2C_i2c-tools | I2C Tools]]软件包提供了: |
| − | * | + | * shell命令通过i2c-dev通过SMBus协议访问I2C |
| − | * library | + | * library 将SMBus函数用于用户空间应用程序,所有这些函数都在这个SMBus协议API中进行了描述。<br/> |
| − | + | '''Note''' : 某些外围设备无需SMBus协议即可工作。 | |
| − | '''Note''' : | ||
====Application==== | ====Application==== | ||
| − | + | 应用程序可以使用 [[I2C_i2c-tools | I2C Tools]], libI2C ([[I2C_i2c-tools|I2C Tools]]), i2c-dev. | |
===API description=== | ===API description=== | ||
====libi2c==== | ====libi2c==== | ||
| − | + | I2C工具<ref name="I2C tools">https://i2c.wiki.kernel.org/index.php/I2C_Tools</ref> 软件包提供了一组Shell命令,这些命令主要使用SMBus协议访问I2C和API, 开发一个应用程序(libi2c)。<br/> | |
| − | + | 所有工具和libi2c均依赖SMBus API,但[[I2C_i2c-tools#I2C_Transfer| i2ctransfer]]不是,因为它依赖于标准I2C协议。<br/> | |
| − | + | 工具和libi2c通过'''devfs'''读/写/ ioctl调用访问SMBus和I2C API。<br/><br/> | |
| − | + | SMBus协议构成 I<sup>2</sup>C 规范中定义的数据传输格式的子集。 <br/> | |
| − | + | SMBus规范中定义的标准方法无法访问不符合这些协议的I2C外设。 <br/> | |
| − | + | 有关 '''I<sup>2</sup>C'''<ref name="I2C summary">{{CodeSource | Linux kernel | Documentation/i2c/summary}} I2C and SMBus summary</ref> 和'''SMBus协议'''<ref name="SMBus protocol">{{CodeSource | Linux kernel | Documentation/i2c/smbus-protocol}} SMBus protocol summary</ref>的更多详细信息,请参见外部参考。 | |
| − | libi2c | + | libi2c API模拟“SMBus协议”<ref name="SMBus protocol">{{CodeSource | Linux kernel | Documentation/i2c/smbus-protocol}} SMBus protocol summary</ref> ,但在用户空间级别。<br/> |
| − | + | 此库中的API与 ''SMBus protocol''<ref name="SMBus protocol">{{CodeSource | Linux kernel | Documentation/i2c/smbus-protocol}} SMBus protocol summary</ref>中的API相同。除了特定的SMBus协议API(例如SMBus Host Notify和SMBus Alert)外,所有SMBus API均在此处重复。 | |
====User space application==== | ====User space application==== | ||
| − | [[#user_space_application| User space application]] | + | [[#user_space_application| User space application]] 正在使用内核驱动程序(i2c-dev),该驱动程序通过devfs提供I2C访问。<br /> |
| − | ''' | + | '''支持的系统调用: '''open(), close(), read(), write(), ioctl(), llseek(), release().<br /> |
{| | {| | ||
|+ Supported ioctls commands | |+ Supported ioctls commands | ||
| 第119行: | 第119行: | ||
|Perform an SMBus transfer instead of standard I<sup>2</sup>C | |Perform an SMBus transfer instead of standard I<sup>2</sup>C | ||
|} | |} | ||
| − | + | 以上命令是主要命令(框架中定义了更多命令): | |
| − | + | 请参见'''dev-interface API'''<ref name="dev-interface API">{{CodeSource | Linux kernel | Documentation/i2c/dev-interface}} dev-interface API</ref> 获取完整列表。 | |
| − | |||
====Kernel space peripheral driver==== | ====Kernel space peripheral driver==== | ||
| − | [[#Kernel_space_driver| Kernel space peripheral driver]] | + | [[#Kernel_space_driver| Kernel space peripheral driver]] 同时访问 I<sup>2</sup>C 和SMBus设备,并使用以下 '''I2C核心API'''<ref name="I2C core API">https://www.kernel.org/doc/html/latest/driver-api/i2c.html</ref> |
==Configuration== | ==Configuration== | ||
===Kernel configuration=== | ===Kernel configuration=== | ||
| − | + | 使用Linux Menuconfig工具在内核配置中激活I2C: [[Menuconfig or how to configure kernel]]. | |
[x] Device Drivers | [x] Device Drivers | ||
| 第135行: | 第134行: | ||
[x] STMicroelectronics STM32F7 I2C support | [x] STMicroelectronics STM32F7 I2C support | ||
| − | + | 这可以在您的内核中手动完成: | |
CONFIG_I2C=y | CONFIG_I2C=y | ||
CONFIG_I2C_CHARDEV=y | CONFIG_I2C_CHARDEV=y | ||
CONFIG_I2C_STM32F7=y | CONFIG_I2C_STM32F7=y | ||
| − | + | 如果软件需要SMBus特定协议,例如SMBus Alert协议和SMBus Host Notify协议,则添加: | |
[x] Device Drivers | [x] Device Drivers | ||
[x] I2C support | [x] I2C support | ||
| 第149行: | 第148行: | ||
[x] STMicroelectronics STM32F7 I2C support | [x] STMicroelectronics STM32F7 I2C support | ||
| − | + | 这可以在您的内核中手动完成: | |
CONFIG_I2C_SMBUS=y | CONFIG_I2C_SMBUS=y | ||
===Device tree configuration=== | ===Device tree configuration=== | ||
| − | + | 请参考[[I2C device tree configuration]]. | |
==How to use the framework== | ==How to use the framework== | ||
| − | + | 本节介绍如何使用框架访问I2C外设。 | |
===i2c-tools package=== | ===i2c-tools package=== | ||
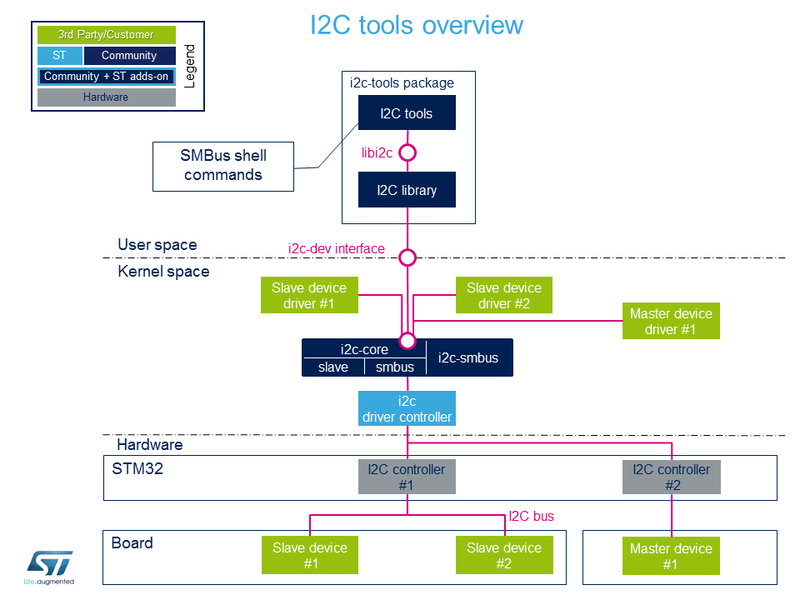
| − | + | 在用户空间中将[[I2C_i2c-tools | I2C Tools]] 与基于'''SMBus API协议'''<ref name="SMBus protocol">{{CodeSource | Linux kernel | Documentation/i2c/smbus-protocol}} SMBus protocol summary</ref> 的shell命令配合使用,可以轻松快速地访问I2C,而无需编写任何代码。<br /> | |
| − | ''' | + | '''用例''' 许多外壳命令允许检测I2C总线并通过SMBus协议访问I2C外设。 该软件包包括一个库,以便在C程序中使用SMBus协议。<br /> |
| − | + | 有关详细说明,请访问[[I2C_i2c-tools| link]]。 | |
[[File:i2c-tools-overview.png|800px|center|link=|Using i2c-tools overview]] | [[File:i2c-tools-overview.png|800px|center|link=|Using i2c-tools overview]] | ||
=== User space application === | === User space application === | ||
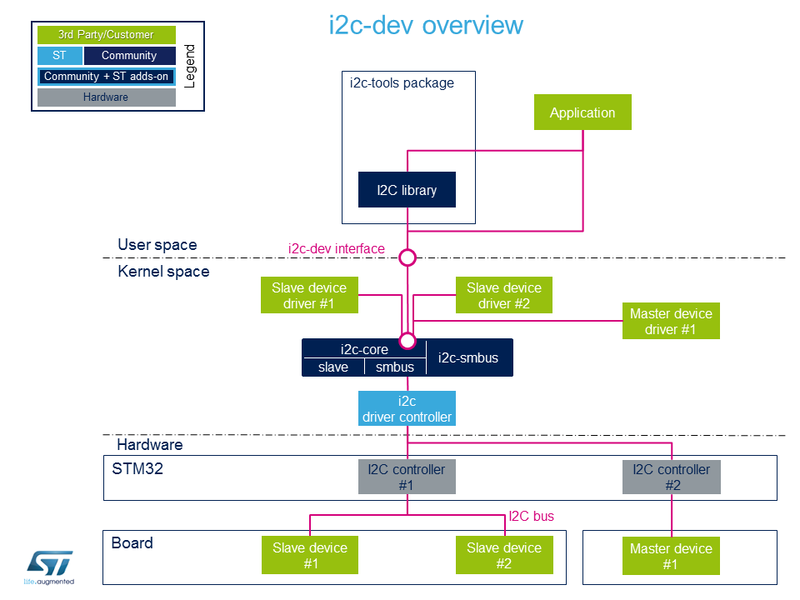
| − | + | 允许在用户空间中使用带有此 '''device interface'''的i2c-dev内核驱动程序来开发应用程序。<ref name="dev-interface API">{{CodeSource | Linux kernel | Documentation/i2c/dev-interface}} dev-interface API</ref>.<br /> | |
| − | ''' | + | '''用例:'''通过加载i2c-dev模块,用户可以通过'''/dev'''接口访问I2C。 通过函数open()、ioctl()、read()、write()和lose()可以非常轻松地访问I2C。 如果外围设备兼容,则也可以使用 [[I2C_i2c-tools | I2C Tools]] 库。<br /> |
[[File:i2c-dev-overview.png|800px|center|link=|Using i2c-dev overview]] | [[File:i2c-dev-overview.png|800px|center|link=|Using i2c-dev overview]] | ||
=== Kernel space driver === | === Kernel space driver === | ||
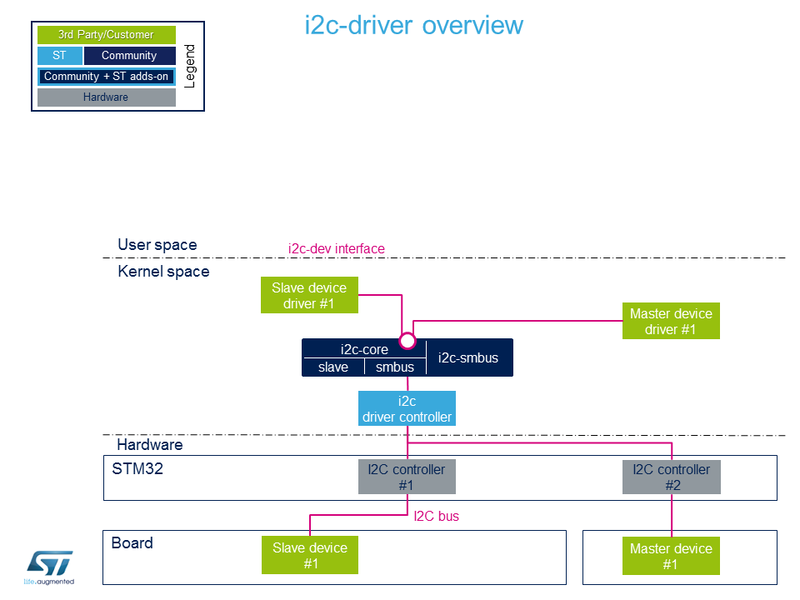
| − | + | 允许使用'''I2C core API'''开发已编译到内核或作为模块插入的驱动程序<ref name="I2C core API"/><br /> | |
| − | + | Linux内核提供了有关如何编写I2C客户端驱动程序的示例 | |
| − | ''' | + | <ref>https://www.kernel.org/doc/html/latest/i2c/writing-clients.html</ref><br /> |
| + | '''用例''' : 使用内核空间内的特定驱动程序控制I2C外设。 例如,驱动程序在系统引导时初始化所有参数,并通过sysfs创建对外围数据的访问。<br /> | ||
[[File:i2c-driver-overview.png|800 px|center|link=|Using driver i2c overview]] | [[File:i2c-driver-overview.png|800 px|center|link=|Using driver i2c overview]] | ||
===Board description=== | ===Board description=== | ||
| − | + | 要实例化外围设备,存在几种方法:更多细节,请参见 '''实例化设备'''<ref ="instantiating-devices">{{CodeSource | Linux kernel | Documentation/i2c/instantiating-devices}} How to instantiate I2C devices</ref> 。 <br/> | |
| − | + | 下列资料主要介绍 '''device tree''', '''sysfs''' 和 '''Application Code'''. | |
==== Device tree ==== | ==== Device tree ==== | ||
| − | + | 设备树是对内核用来了解连接哪些设备的硬件的描述。为了在I2C总线上添加从设备,请使用与新设备相关的信息来完成设备树。<br /> | |
| − | ''' | + | '''例子:''' 带有EEPROM |
<syntaxhighlight lang="c" line highlight="10-14"> | <syntaxhighlight lang="c" line highlight="10-14"> | ||
| 第201行: | 第201行: | ||
</syntaxhighlight> | </syntaxhighlight> | ||
| − | + | EEPROM现在在地址为0x50的总线i2c-X上实例化(X取决于运行时探测的适配器数量),并且它与使用相同属性注册的驱动程序兼容。<br/> | |
| − | + | 请注意,驱动程序指定SCL上升/下降时间作为输入。<br/> | |
| − | + | 有关正确的配置和说明,请参考 [[I2C device tree configuration]]。 | |
| − | + | 请注意,I2C规范为特殊目的保留了一系列地址,请参阅 '''slave addressing'''<ref name="slave addressing">http://www.totalphase.com/support/articles/200349176-7-bit-8-bit-and-10-bit-I2C-Slave-Addressing Slave addressing</ref>.<br /> | |
| − | + | 下图显示了设备树及其用法之间的关系:<br /> | |
[[File:i2c-overview-dt.png|840 px|center|link=|relation between device tree and kernel]] | [[File:i2c-overview-dt.png|840 px|center|link=|relation between device tree and kernel]] | ||
====sysfs==== | ====sysfs==== | ||
| − | + | 通过sysfs,i2c-core提供了实例化和删除外围设备的可能性:<br /><br /> | |
| − | + | 在地址0xAA上添加附加到总线x的外围设备“ myPeripheralName”<br /> | |
| − | ''' | + | '''注意''' 字段 "myPeripheralName" 应该与兼容的驱动程序字符串具有相同的名称,以便它们彼此匹配。 |
<pre> | <pre> | ||
echo myPeripheralName 0xAA > i2c-x/new_device | echo myPeripheralName 0xAA > i2c-x/new_device | ||
</pre> | </pre> | ||
| − | + | 卸下连接到总线x的地址0xAA的外围设备 | |
<pre> | <pre> | ||
echo 0xAA > i2c-x/delete_device | echo 0xAA > i2c-x/delete_device | ||
</pre> | </pre> | ||
| − | + | 进入每个驱动程序目录('''/sys/bus/i2c/drivers/at24/''' for the EEPROM peripheral example), it is possible to:<br /> | |
| − | + | 将外围设备与驱动器绑定 | |
<pre> | <pre> | ||
echo 3-0050 > bind | echo 3-0050 > bind | ||
</pre> | </pre> | ||
| − | + | 取消外围设备与驱动程序的绑定 | |
<pre> | <pre> | ||
echo 3-0050 > unbind | echo 3-0050 > unbind | ||
| 第237行: | 第237行: | ||
==== Application code ==== | ==== Application code ==== | ||
| − | + | 这是用于在不使用设备树的情况下将新的从设备注册到I2C适配器的极简代码。 | |
| − | |||
<syntaxhighlight lang="c" line highlight="4-6,18,20"> | <syntaxhighlight lang="c" line highlight="4-6,18,20"> | ||
#include <linux/i2c.h> | #include <linux/i2c.h> | ||
| − | /* | + | /* 创建具有从属地址的设备 <0x42> */ |
static struct i2c_board_info stm32_i2c_test_board_info = { | static struct i2c_board_info stm32_i2c_test_board_info = { | ||
I2C_BOARD_INFO("i2c_test07", 0x42); | I2C_BOARD_INFO("i2c_test07", 0x42); | ||
| 第248行: | 第247行: | ||
/* | /* | ||
| − | + | 跳过模块定义创建 | |
*/ | */ | ||
| 第264行: | 第263行: | ||
==How to trace and debug the framework == | ==How to trace and debug the framework == | ||
| − | + | 在 Linux<sup>®</sup> 内核中,有调试和监视I2C的标准方法。调试可以在不同的级别进行:硬件和软件。 | |
===How to trace=== | ===How to trace=== | ||
====Dynamic trace==== | ====Dynamic trace==== | ||
| − | + | 此处提供了详细的动态跟踪 [[How to use the kernel dynamic debug]]<br/> | |
{{Board$}} echo "file i2c-* +p" > /sys/kernel/debug/dynamic_debug/control | {{Board$}} echo "file i2c-* +p" > /sys/kernel/debug/dynamic_debug/control | ||
| − | + | 此命令在运行时启用与I2C内核和驱动程序有关的所有跟踪。<br/><br/> | |
| − | + | 尽管如此,在 [[Menuconfig or how to configure kernel | Linux® Kernel menu configuration]] 级,它提供了调试的粒度:核心和/或总线。<br/> | |
Device Drivers -> | Device Drivers -> | ||
[*] I2C support -> | [*] I2C support -> | ||
| 第277行: | 第276行: | ||
[*] I2C Bus debugging messages | [*] I2C Bus debugging messages | ||
| − | * | + | * I2C核心调试消息 (CONFIG_I2C_DEBUG_CORE)<br> 使用DEBUG标志编译I2C引擎。 |
| − | * | + | * I2C总线调试消息(CONFIG_I2C_DEBUG_BUS)<br> 用DEBUG标志编译I2C驱动程序。 |
| − | + | 同时具有 '''I2C Core''' 和 '''I2C Bus'''调试消息等同于使用上述动态调试命令:dmesg输出将相同。 | |
====Bus snooping==== | ====Bus snooping==== | ||
| − | + | 总线侦听对于查看I2C协议以及查看STM32和设备之间交换的内容非常方便。<br/> | |
| − | + | 由于此调试功能使用 [[Ftrace]],因此请参考[[Ftrace]] 文章以启用它。 | |
| − | + | 为了访问事件以进行I2C总线侦听,必须进行以下内核配置: | |
Kernel hacking -> | Kernel hacking -> | ||
| 第292行: | 第291行: | ||
[*] Trace process context switches and events | [*] Trace process context switches and events | ||
| − | + | 根据所使用的协议,有必要启用i2c和/或smbus跟踪器,如下所示: | |
echo 1 > /sys/kernel/debug/tracing/events/i2c/enable | echo 1 > /sys/kernel/debug/tracing/events/i2c/enable | ||
echo 1 > /sys/kernel/debug/tracing/events/smbus/enable | echo 1 > /sys/kernel/debug/tracing/events/smbus/enable | ||
| − | + | 然后使用以下命令启用跟踪: | |
echo 1 > /sys/kernel/debug/tracing/tracing_on | echo 1 > /sys/kernel/debug/tracing/tracing_on | ||
| 第302行: | 第301行: | ||
cat /sys/kernel/debug/tracing/trace | cat /sys/kernel/debug/tracing/trace | ||
| − | + | 这是输出的一部分,以及在i2c-0总线上使用“ i2cdetect”命令时的外观: | |
... smbus_write: i2c-0 a=003 f=0000 c=0 QUICK l=0 [] | ... smbus_write: i2c-0 a=003 f=0000 c=0 QUICK l=0 [] | ||
... smbus_result: i2c-0 a=003 f=0000 c=0 QUICK wr res=-6 | ... smbus_result: i2c-0 a=003 f=0000 c=0 QUICK wr res=-6 | ||
| 第308行: | 第307行: | ||
... smbus_result: i2c-0 a=004 f=0000 c=0 QUICK wr res=-6 | ... smbus_result: i2c-0 a=004 f=0000 c=0 QUICK wr res=-6 | ||
| − | {{Info| | + | {{Info|请注意,i2cdetect,i2cget / i2cput,i2cdump正在执行基于smbus协议的事务.}} |
| − | + | 相反,以下输出显示了以I2C协议模式完成的事务的结果: | |
... i2c_write: i2c-1 #0 a=042 f=0000 l=1 [45] | ... i2c_write: i2c-1 #0 a=042 f=0000 l=1 [45] | ||
... i2c_result: i2c-1 n=1 ret=1 | ... i2c_result: i2c-1 n=1 ret=1 | ||
| 第316行: | 第315行: | ||
... i2c_result: i2c-2 n=1 ret=1 | ... i2c_result: i2c-2 n=1 ret=1 | ||
| − | + | I2C总线走线的使用在此处进行了很好的描述 '''I2C 总线监听'''<ref name="I2C bus snooping">https://linuxtv.org/wiki/index.php/Bus_snooping/sniffing#i2c I2C Bus Snooping</ref>. | |
===How to debug=== | ===How to debug=== | ||
====Detect I2C configuration==== | ====Detect I2C configuration==== | ||
=====sysfs===== | =====sysfs===== | ||
| − | + | 实例化外围设备后,i2c-core和内核会通过sysfs导出不同的文件:<br /> | |
| − | '''/sys/class/i2c-adapter/i2c-x''' | + | '''/sys/class/i2c-adapter/i2c-x''' 显示所有实例化的I2C总线,其中“ x”为I2C总线号。<br /> |
| − | '''/sys/bus/i2c/devices''' | + | '''/sys/bus/i2c/devices'''列出所有实例化的外围设备。例如,有一个名为'''3-0050'''的目录,它对应于总线号3上地址0x50的EEPROM外设。<br /> |
| − | '''/sys/bus/i2c/drivers''' | + | '''/sys/bus/i2c/drivers''' 列出所有实例化的驱动程序。 名为'''at24 /'''的目录是EEPROM的驱动程序。<br /> |
<pre> | <pre> | ||
| 第344行: | 第343行: | ||
====devfs==== | ====devfs==== | ||
| − | + | 如果将i2c-dev驱动程序编译到内核中,则目录'''dev'''包含所有编号为i2c-0至i2c-n的I2C总线名称。 | |
<pre> | <pre> | ||
/dev/i2c-0 | /dev/i2c-0 | ||
| 第355行: | 第354行: | ||
====i2c-tools==== | ====i2c-tools==== | ||
| − | + | 检查所有I2C实例化的适配器: | |
{{Board$}}i2cdetect -l | {{Board$}}i2cdetect -l | ||
| − | + | 有关完整说明,请参阅[[I2C_i2c-tools| i2c-tools]]。 | |
==Source code location== | ==Source code location== | ||
| − | * | + | * I2C框架驱动程序位于{{CodeSource | Linux kernel | drivers/i2c drivers/i2c}} |
| − | * I2C | + | * I2C STM32驱动程序位于{{CodeSource | Linux kernel | drivers/i2c/busses/i2c-stm32f7.c}} |
| − | * | + | * 2C总线用户接口在 {{CodeSource | Linux kernel | include/uapi/linux/i2c.h}} ,I2C dev在 {{CodeSource | Linux kernel | include/uapi/linux/i2c-dev.h}}. |
==To go further== | ==To go further== | ||
| − | + | Bootlin写了一篇很好的演练文章: | |
| − | '' | + | ''为STM32MP1构建Linux系统:连接I2C传感器''<ref name="Building a Linux system for the STM32MP1: connecting an I2C sensor">https://bootlin.com/blog/building-a-linux-system-for-the-stm32mp1-connecting-an-i2c-sensor/</ref> |
==References== | ==References== | ||
<references /> | <references /> | ||
2020年11月6日 (五) 17:53的最新版本
本文提供有关I2C系统以及如何插入I2C STM32驱动程序的基本信息。
目录
Framework purpose
本文旨在解释如何更准确地使用I2C:
- 如何在 Linux® BSP 上激活I2C接口
- 如何从内核空间访问I2C
- 如何从用户空间访问I2C。
本文介绍了在master 和 slave模式下的 Linux® I2C[1]接口。
通过该外部资源,提出了I2C[2] 的简介。
有关 slave 接口的说明,请参见slave-interface[3].
System overview
I2C 是“ IC间总线”的缩写,“ Inter-IC”总线是一种简单的总线协议,广泛用于低数据速率通信就足够了。
I2C是微处理器 I2C 外围设备接口的缩写。
在微处理器设备周围,用户可以添加许多 I2C 外部设备来创建定制板。 可以通过I2C从用户空间或内核空间访问每个外部设备。
Component description
Board external I2C devices
- 从设备X是相对于STM32表现为从设备的物理设备(通过 I2C 总线连接到STM32)。
STM32仍是 I2C 总线上的主机。
- 主设备X是相对于STM32充当主设备的物理设备 (通过 I2C 总线连接到STM32) 。
在这种情况下,STM32充当 I2C 总线上的从设备。
STM32 I2C internal peripheral controller
它对应于STM32 I2C适配器,该适配器处理与同一总线上连接的任何外部设备的通信。
它管理从设备(如果有的话),并且如果连接了外部主设备,则可以充当从设备。
STM32微处理器设备通常嵌入 I2C internal peripheral 的多个实例,以管理多个I2C总线。 提供了一个驱动程序,用于控制硬件。
i2c-stm32
内部STM32 I2C控制器驱动程序向基于i2c-core-base的ST I2C内部外围控制器抽象层提供了支持。
它定义了I2C核心基础要使用的所有I2C传输方法算法,其中包括I2C和SMBus[4] 传输API ,注册/注销从属API和功能检查。
即使I2C Core可以在整个标准I2C消息中模拟SMBus协议,所有SMBus功能都在驱动程序中实现。
i2c-core
这是通信的大脑:它实例化和管理所有总线和外围设备。
- 如其名称所述,为i2c-core ,它是I2C核心引擎,但它也负责解析适配器和/或设备的设备树条目
- i2c-core-smbus处理所有与SMBus相关的API。
- i2c-core-slave 管理充当STM32中的从设备的I2C设备。
- i2c-smbus处理特定的协议SMBus警报。 (由I2C核心库处理的SMBus主机通知)
Board peripheral drivers
该层表示与物理外围设备关联的所有驱动程序。
外围设备驱动程序可以编译为内核模块,也可以直接编译为内核(也称为内置).
i2c-dev
i2c-dev是用户与外围设备之间的接口。 它是一个内核驱动程序,它使用此dev-interface API提供对用户空间应用程序的I2C总线访问。 请参见示例API Description.
i2c-tools
I2C Tools软件包提供了:
- shell命令通过i2c-dev通过SMBus协议访问I2C
- library 将SMBus函数用于用户空间应用程序,所有这些函数都在这个SMBus协议API中进行了描述。
Note : 某些外围设备无需SMBus协议即可工作。
API description
libi2c
I2C工具[5] 软件包提供了一组Shell命令,这些命令主要使用SMBus协议访问I2C和API, 开发一个应用程序(libi2c)。
所有工具和libi2c均依赖SMBus API,但 i2ctransfer不是,因为它依赖于标准I2C协议。
工具和libi2c通过devfs读/写/ ioctl调用访问SMBus和I2C API。
SMBus协议构成 I2C 规范中定义的数据传输格式的子集。
SMBus规范中定义的标准方法无法访问不符合这些协议的I2C外设。
有关 I2C[6] 和SMBus协议[7]的更多详细信息,请参见外部参考。
libi2c API模拟“SMBus协议”[7] ,但在用户空间级别。
此库中的API与 SMBus protocol[7]中的API相同。除了特定的SMBus协议API(例如SMBus Host Notify和SMBus Alert)外,所有SMBus API均在此处重复。
User space application
User space application 正在使用内核驱动程序(i2c-dev),该驱动程序通过devfs提供I2C访问。
支持的系统调用: open(), close(), read(), write(), ioctl(), llseek(), release().
| Constant | Description |
|---|---|
| I2C_SLAVE/I2C_SLAVE_FORCE | Sets slave address for read/write operations |
| I2C_FUNCS | Gets bus functionalities |
| I2C_TENBIT | 10bits address support |
| I2C_RDWR | Combined R/W transfer (one STOP only) |
| I2C_SMBUS | Perform an SMBus transfer instead of standard I2C |
以上命令是主要命令(框架中定义了更多命令): 请参见dev-interface API[8] 获取完整列表。
Kernel space peripheral driver
Kernel space peripheral driver 同时访问 I2C 和SMBus设备,并使用以下 I2C核心API[9]
Configuration
Kernel configuration
使用Linux Menuconfig工具在内核配置中激活I2C: Menuconfig or how to configure kernel.
[x] Device Drivers
    [x] I2C support
        [x] I2C device interface
        [ ] I2C Hardware Bus support
            [x] STMicroelectronics STM32F7 I2C support
这可以在您的内核中手动完成:
CONFIG_I2C=y
CONFIG_I2C_CHARDEV=y
CONFIG_I2C_STM32F7=y
如果软件需要SMBus特定协议,例如SMBus Alert协议和SMBus Host Notify协议,则添加:
[x] Device Drivers
    [x] I2C support
        [x] I2C device interface
        [ ] Autoselect pertinent helper modules
        [x] SMBus-specific protocols
        [ ] I2C Hardware Bus support
            [x] STMicroelectronics STM32F7 I2C support
这可以在您的内核中手动完成:
CONFIG_I2C_SMBUS=y
Device tree configuration
How to use the framework
本节介绍如何使用框架访问I2C外设。
i2c-tools package
在用户空间中将 I2C Tools 与基于SMBus API协议[7] 的shell命令配合使用,可以轻松快速地访问I2C,而无需编写任何代码。
用例 许多外壳命令允许检测I2C总线并通过SMBus协议访问I2C外设。 该软件包包括一个库,以便在C程序中使用SMBus协议。
有关详细说明,请访问 link。
User space application
允许在用户空间中使用带有此 device interface的i2c-dev内核驱动程序来开发应用程序。[8].
用例:通过加载i2c-dev模块,用户可以通过/dev接口访问I2C。 通过函数open()、ioctl()、read()、write()和lose()可以非常轻松地访问I2C。 如果外围设备兼容,则也可以使用 I2C Tools 库。
Kernel space driver
允许使用I2C core API开发已编译到内核或作为模块插入的驱动程序[9]
Linux内核提供了有关如何编写I2C客户端驱动程序的示例
[10]
用例 : 使用内核空间内的特定驱动程序控制I2C外设。 例如,驱动程序在系统引导时初始化所有参数,并通过sysfs创建对外围数据的访问。
Board description
要实例化外围设备,存在几种方法:更多细节,请参见 实例化设备[11] 。
下列资料主要介绍 device tree, sysfs 和 Application Code.
Device tree
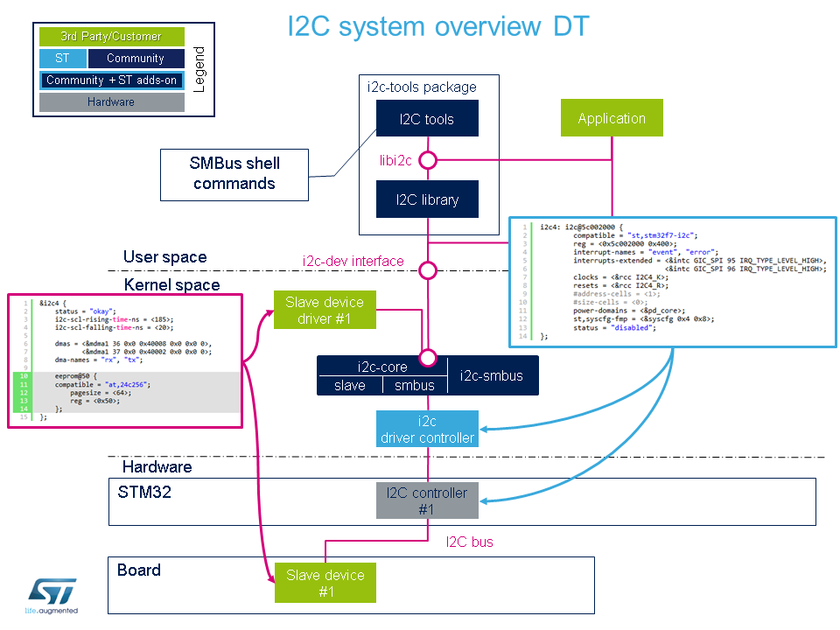
设备树是对内核用来了解连接哪些设备的硬件的描述。为了在I2C总线上添加从设备,请使用与新设备相关的信息来完成设备树。
例子: 带有EEPROM
 1 &i2c4 {
 2     status = "okay";
 3     i2c-scl-rising-time-ns = <185>;
 4     i2c-scl-falling-time-ns = <20>;
 5
 6     dmas = <&mdma1 36 0x0 0x40008 0x0 0x0 0>,
 7            <&mdma1 37 0x0 0x40002 0x0 0x0 0>;
 8     dma-names = "rx", "tx";
 9
10     eeprom@50 {
11     compatible = "at,24c256";
12         pagesize = <64>;
13         reg = <0x50>;
14     };
15 };
EEPROM现在在地址为0x50的总线i2c-X上实例化(X取决于运行时探测的适配器数量),并且它与使用相同属性注册的驱动程序兼容。
请注意,驱动程序指定SCL上升/下降时间作为输入。
有关正确的配置和说明,请参考 I2C device tree configuration。
请注意,I2C规范为特殊目的保留了一系列地址,请参阅 slave addressing[12].
下图显示了设备树及其用法之间的关系:
sysfs
通过sysfs,i2c-core提供了实例化和删除外围设备的可能性:
在地址0xAA上添加附加到总线x的外围设备“ myPeripheralName”
注意 字段 "myPeripheralName" 应该与兼容的驱动程序字符串具有相同的名称,以便它们彼此匹配。
echo myPeripheralName 0xAA > i2c-x/new_device
卸下连接到总线x的地址0xAA的外围设备
echo 0xAA > i2c-x/delete_device
进入每个驱动程序目录(/sys/bus/i2c/drivers/at24/ for the EEPROM peripheral example), it is possible to:
将外围设备与驱动器绑定
echo 3-0050 > bind
取消外围设备与驱动程序的绑定
echo 3-0050 > unbind
Application code
这是用于在不使用设备树的情况下将新的从设备注册到I2C适配器的极简代码。
 1 #include <linux/i2c.h>
 2
 3 /* 创建具有从属地址的设备 <0x42> */
 4 static struct i2c_board_info stm32_i2c_test_board_info = {
 5     I2C_BOARD_INFO("i2c_test07", 0x42);
 6 };
 7
 8 /*
 9   跳过模块定义创建
10 */
11
12 static int __init i2c_test_probe(void)
13 {
14     struct i2c_adapter *adap;
15     struct i2c_client *client;
16
17     /* Get I2C controller */
18     adap = i2c_get_adapter(i);
19     /* Build new devices */
20     client = i2c_new_device(adap,&stm32_i2c_test_board_info);
21 }
How to trace and debug the framework
在 Linux® 内核中,有调试和监视I2C的标准方法。调试可以在不同的级别进行:硬件和软件。
How to trace
Dynamic trace
此处提供了详细的动态跟踪 How to use the kernel dynamic debug
Board $> echo "file i2c-* +p" > /sys/kernel/debug/dynamic_debug/control
此命令在运行时启用与I2C内核和驱动程序有关的所有跟踪。
尽管如此,在 Linux® Kernel menu configuration 级,它提供了调试的粒度:核心和/或总线。
Device Drivers ->
    [*] I2C support ->
        [*] I2C Core debugging messages
        [*] I2C Bus debugging messages
- I2C核心调试消息 (CONFIG_I2C_DEBUG_CORE)
使用DEBUG标志编译I2C引擎。 - I2C总线调试消息(CONFIG_I2C_DEBUG_BUS)
用DEBUG标志编译I2C驱动程序。
同时具有 I2C Core 和 I2C Bus调试消息等同于使用上述动态调试命令:dmesg输出将相同。
Bus snooping
总线侦听对于查看I2C协议以及查看STM32和设备之间交换的内容非常方便。
由于此调试功能使用 Ftrace,因此请参考Ftrace 文章以启用它。
为了访问事件以进行I2C总线侦听,必须进行以下内核配置:
Kernel hacking ->
    [*] Tracers ->
        [*] Trace process context switches and events
根据所使用的协议,有必要启用i2c和/或smbus跟踪器,如下所示:
echo 1 > /sys/kernel/debug/tracing/events/i2c/enable
echo 1 > /sys/kernel/debug/tracing/events/smbus/enable
然后使用以下命令启用跟踪:
echo 1 > /sys/kernel/debug/tracing/tracing_on
After a transaction, trace can be read by looking at the trace file:
cat /sys/kernel/debug/tracing/trace
这是输出的一部分,以及在i2c-0总线上使用“ i2cdetect”命令时的外观:
... smbus_write: i2c-0 a=003 f=0000 c=0 QUICK l=0 []
... smbus_result: i2c-0 a=003 f=0000 c=0 QUICK wr res=-6
... smbus_write: i2c-0 a=004 f=0000 c=0 QUICK l=0 []
... smbus_result: i2c-0 a=004 f=0000 c=0 QUICK wr res=-6
| 请注意,i2cdetect,i2cget / i2cput,i2cdump正在执行基于smbus协议的事务. |
相反,以下输出显示了以I2C协议模式完成的事务的结果:
... i2c_write: i2c-1 #0 a=042 f=0000 l=1 [45]
... i2c_result: i2c-1 n=1 ret=1
... i2c_write: i2c-2 #0 a=020 f=0000 l=1 [45]
... i2c_result: i2c-2 n=1 ret=1
I2C总线走线的使用在此处进行了很好的描述 I2C 总线监听[13].
How to debug
Detect I2C configuration
sysfs
实例化外围设备后,i2c-core和内核会通过sysfs导出不同的文件:
/sys/class/i2c-adapter/i2c-x 显示所有实例化的I2C总线,其中“ x”为I2C总线号。
/sys/bus/i2c/devices列出所有实例化的外围设备。例如,有一个名为3-0050的目录,它对应于总线号3上地址0x50的EEPROM外设。
/sys/bus/i2c/drivers 列出所有实例化的驱动程序。 名为at24 /的目录是EEPROM的驱动程序。
/sys/bus/i2c/devices/3-0050/
            /       /
            /       /i2c-3/3-0050/
            /
            /drivers/at24/3-0050/
/sys/class/i2c-adapter/i2c-0/
                      /i2c-1/
                      /i2c-2/
                      /i2c-3/3-0050/
                      /i2c-4/
                      /i2c-5/
devfs
如果将i2c-dev驱动程序编译到内核中,则目录dev包含所有编号为i2c-0至i2c-n的I2C总线名称。
/dev/i2c-0
    /i2c-1
    /i2c-2
    /i2c-3
    /i2c-4
    /i2c-n
Source code location
To go further
Bootlin写了一篇很好的演练文章: 为STM32MP1构建Linux系统:连接I2C传感器[14]
References
- ↑ http://www.i2c-bus.org/
- ↑ https://bootlin.com/doc/training/linux-kernel/
- ↑ Documentation/i2c/slave-interface| |}} Documentation/i2c/slave-interface slave interface description
- ↑ https://www.i2c-bus.org/smbus/
- ↑ https://i2c.wiki.kernel.org/index.php/I2C_Tools
- ↑ Documentation/i2c/summary| |}} Documentation/i2c/summary I2C and SMBus summary
- ↑ 7.07.17.27.3 Documentation/i2c/smbus-protocol| |}} Documentation/i2c/smbus-protocol SMBus protocol summary
- ↑ 8.08.1 Documentation/i2c/dev-interface| |}} Documentation/i2c/dev-interface dev-interface API
- ↑ 9.09.1 https://www.kernel.org/doc/html/latest/driver-api/i2c.html
- ↑ https://www.kernel.org/doc/html/latest/i2c/writing-clients.html
- ↑ Documentation/i2c/instantiating-devices| |}} Documentation/i2c/instantiating-devices How to instantiate I2C devices
- ↑ http://www.totalphase.com/support/articles/200349176-7-bit-8-bit-and-10-bit-I2C-Slave-Addressing Slave addressing
- ↑ https://linuxtv.org/wiki/index.php/Bus_snooping/sniffing#i2c I2C Bus Snooping
- ↑ https://bootlin.com/blog/building-a-linux-system-for-the-stm32mp1-connecting-an-i2c-sensor/